完成しました!!
こちらはちょっと複雑な感じですが、あとでシンプルな構成なk8s+misskey鯖の立て方を別記事で載せるかも?
MisskeyはMisskey本体(web)+PostgreSQL(データーベース)+Redisで動いているのでデーターベースやRedisを冗長化しつつ構成してみます。
のくの備忘録サイトです。
完成しました!!
こちらはちょっと複雑な感じですが、あとでシンプルな構成なk8s+misskey鯖の立て方を別記事で載せるかも?
MisskeyはMisskey本体(web)+PostgreSQL(データーベース)+Redisで動いているのでデーターベースやRedisを冗長化しつつ構成してみます。
2023/09/26更新 Ubuntu Server 22.04 LTS / PostgreSQL 15
pg_rmanでオンラインバックアップを取りたいのにweb上で見かけたライブラリをインストールしてもPostgreSQL15だと上手く動かなかったので、その辺成功したメモ
Miskkeyで使うDBのDockerfile(イメージにはpostgres:15-bookwormを使用)に以下を追加
実際には前回のPGroonga導入で作成したDockerfileに追記しています
スクリプトはDockerfileと同じフォルダに作成
Tiniを入れてPostgreSQLのDocker内のPIDが1にならないようにします。リストアするときにPostgreSQLを停止しないと行けないのですが、PIDが1になっているとPostgrSQLの停止=Dockerコンテナ自体が停止してしまうためです。
# Add Tini
ENV TINI_VERSION v0.19.0
ADD https://github.com/krallin/tini/releases/download/${TINI_VERSION}/tini /tini
RUN chmod +x /tini
ENTRYPOINT ["/tini", "--"]
# pg_rman install
RUN apt update
RUN apt install -y build-essential libpq-dev git zlib1g-dev
RUN apt-get update
RUN apt-get -y install postgresql-client-15 postgresql-15 postgresql-server-dev-15 libpq-dev
RUN apt-get -y install libpq-dev libselinux1-dev liblz4-dev libpam0g-dev libkrb5-dev libreadline-dev libzstd-dev
RUN git clone https://github.com/ossc-db/pg_rman.git /tmp/pg_rman && \
    cd /tmp/pg_rman && \
    make && make install && \
    rm -rf /tmp/pg_rman
CMD ["docker-entrypoint.sh", "postgres"]#!/bin/bash
BACKUP_DIR="/var/lib/postgresql/backup"
DB_DIR="/var/lib/postgresql/data"
ARCHIVE_DIR="/var/lib/postgresql/archive"
MODE="$1"
/usr/pgsql-15/bin/pg_rman backup --backup-mode=$MODE -b $BACKUP_DIR -D $DB_DIR -A $ARCHIVE_DIRcronでバックアップを定時実行しています
Ubuntu22.04LTS / PostgresSQL15 / Misskey v13.14.2
※2023/09/26更新 Misskey内で完結するように割と修正
Misskey内の検索を強化したいもののMeilisearchの形態素分析がいまいちで検索したい語が探せない(「あんぱん」で「あんぱんまん」がヒット出来ない)ので、PostgresSQL拡張の日本語全文検索拡張PGroongaの導入メモです。
またnote.textだけでなくnote.cwの注意書き部分も検索範囲にします。
PGroongaを使って自鯖のMisskeyで快適にエゴサする tamainaさんの記事を参考にさせて頂いています。
MisskeyやFirefishの個人鯖立ててみたいけどいきなりweb上でやるの怖い!そうだ!宅内鯖に入れて宅内だけで通信しよう!!
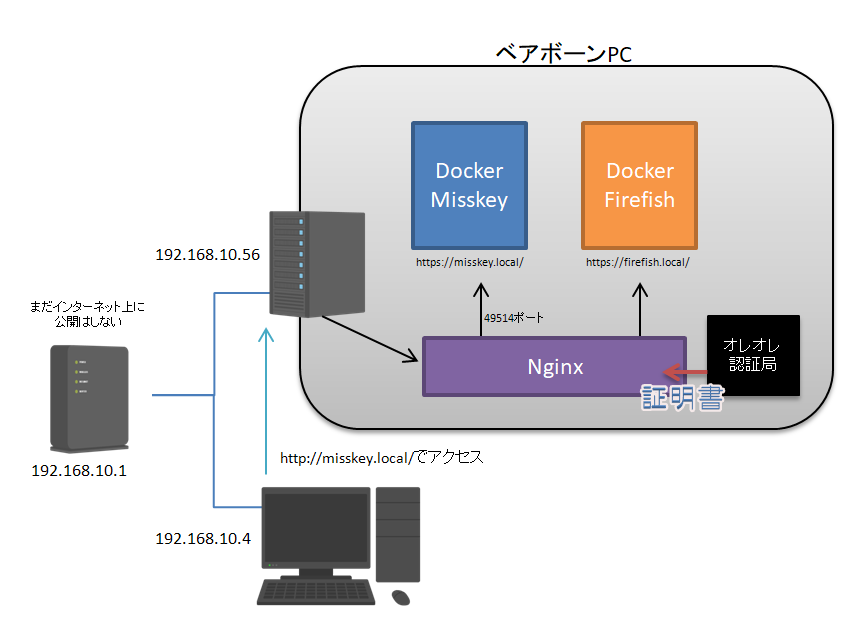
サーバーを立てる所からの個人的メモです~
CSSではなくプラグインです。設定→プラグインに入力して下さい
※2024/5のMisskeyバージョンアップにより不具合発生したためコードを書き直しました。新しいコードを利用下さい。
Misskeyのノート上の特定の文字列を置換するプラグインです。
通常・RN・返信のユーザー名・注釈・本文を置換します。
他にも置換したいものがあればlists内を書き換えてください。
とりあえずサンプルではにじみすサーバーの動きの速いカスタム絵文字とrainbowタグ→scaleタグへ置換されるように書かれています。
{a: "置換前の文字列", b:"置換後の文字列" }のように記載してください。
/// @ 0.18.0
### {
  name: "置換プラグイン"
  version: "0.0.2"
  author: "@[email protected]"
  description: "特定の文字列を置換します"
  permissions: []
  config: {}
}
Plugin:register_note_view_interruptor(@(note){
  // {a: "置換前の文字列", b:"置換後の文字列"}
  let lists = [
    { a: ":ablobfoxhyper:"; b: ":blobfoxowo:" }
    { a: ":ablobcathyper:"; b: ":ameowbouncefast:" }
    { a: ":moshakoparty:"; b: ":moshako:" }
  ]
  for let i, lists.len {
    if (note.renote == null ) {
        if (note.text != null) note.text = note.text.replace(lists[i].a, lists[i].b)
        if (note.cw != null) note.cw = note.cw.replace(lists[i].a, lists[i].b)
        if (note.user.username != null) note.user.username = note.user.username.replace(lists[i].a, lists[i].b)
    }
    if (note.renote != null) {
      if (note.renote.text != null) note.renote.text = note.renote.text.replace(lists[i].a, lists[i].b)
      if (note.renote.cw != null) note.renote.cw = note.renote.cw.replace(lists[i].a, lists[i].b)
      if (note.renote.user.username != null) note.renote.user.username = note.renote.user.username.replace(lists[i].a, lists[i].b)
      if (note.renote.reply != null) {
        if (note.renote.reply.text != null) note.renote.reply.text = note.renote.reply.text.replace(lists[i].a, lists[i].b)
        if (note.renote.reply.cw != null) note.renote.reply.cw = note.renote.reply.cw.replace(lists[i].a, lists[i].b)
        if (note.renote.reply.user.username != null) note.renote.reply.user.username = note.renote.reply.user.username.replace(lists[i].a, lists[i].b)
      }
    }
    if (note.reply != null) {
      if (note.reply.text != null) note.reply.text = note.reply.text.replace(lists[i].a, lists[i].b)
      if (note.reply.cw != null) note.reply.cw = note.reply.cw.replace(lists[i].a, lists[i].b)
      if (note.reply.user.username != null) note.reply.user.username = note.reply.user.username.replace(lists[i].a, lists[i].b)
    }
  }
  note
})Misskeyの記事のURLをPocketサービスへ送信するボタンを付けるUserScriptです。
Google KeepはAPI非公開、EvernoteはAPIがありますがあまりUserScript向きではないようでした。
仮想DOM生成時に実行されるため、少し重くなるかもしれません。
正常に送信が行われると緑色になります。(API送信時に確認のため色を変えているため、Pocketへ保存されている記事の色が変わるわけではありません。)
Pocketに登録し、API利用のためカスタマーキーとアクセストークンを取得します。
上記サイトを参考にして取得しました。
PCブラウザ, Android, iOSでのそれぞれの導入方法はこちらの記事を参照ください。
下記のうち@matchのURLを利用するMisskeyのサーバーへ、consumer_key、access_tokenを取得したPocket APIのカスタマーキーとアクセストークンへ書き換えてください。
// ==UserScript==
// @name         Save URL to Pocket
// @namespace    @[email protected]
// @version      1.0
// @description  Saves the URL to Pocket when the specified button is clicked
// @match        https://nijimiss.moe/*
// @run-at      document-idle
// @grant        GM_xmlhttpRequest
// ==/UserScript==
// ボタンを生成する関数
function createPocketButton(article) {
    const footer = article.querySelector('footer');
    if (footer) {
        const pocketButton = document.createElement('button');
        pocketButton.classList.add('_button', 'xviCy', 'pocket-button');
        pocketButton.style.height = '32px';
        pocketButton.style.borderRadius = '6px';
        const pocketIcon = document.createElement('img');
        pocketIcon.setAttribute('src', 'https://blog.estampie.work/pocket.svg');
        pocketIcon.setAttribute('width', '16');
        pocketIcon.setAttribute('height', '16');
        pocketIcon.classList.add('xeJ4G', 'x5kTm', 'x9Io4');
        pocketButton.appendChild(pocketIcon);
        pocketButton.addEventListener('click', () => {
            const noteElement = article.querySelector('a[href^="/notes/"]');
            if (noteElement) {
                const notePath = noteElement.getAttribute('href');
                const fullURL = 'http://nijimiss.moe' + notePath;
                GM_xmlhttpRequest({
                    method: 'POST',
                    url: 'https://getpocket.com/v3/add',
                    headers: {
                        'Content-Type': 'application/json; charset=UTF-8',
                        'X-Accept': 'application/json',
                    },
                    data: JSON.stringify({
                        url: fullURL,
                        consumer_key: 'カスタマーキー',
                        access_token: 'アクセストークン',
                    }),
                    onload: function(response) {
                        if (response.status >= 200 && response.status < 300) {
                            // API送信が成功した時の処理
                            pocketButton.style.backgroundColor = '#77b58c'; // ボタンの背景色を緑に変える
                        } else {
                            // API送信が失敗した時の処理
                            pocketButton.style.backgroundColor = '#FF0000'; // ボタンの背景色を赤に変える
                        }
                    }
                });
            }
        });
        footer.appendChild(pocketButton);
    }
}
// DOMが変更されたときに実行される関数
const observerCallback = function(mutationsList, observer) {
    for(let mutation of mutationsList) {
        if (mutation.type === 'childList') {
            const articles = document.querySelectorAll('article:not(.has-pocket-button)');
            articles.forEach(article => {
                createPocketButton(article);
                article.classList.add('has-pocket-button');
            });
        }
    }
};
// MutationObserverを設定
const observer = new MutationObserver(observerCallback);
observer.observe(document, { childList: true, subtree: true });
// 初期ページの記事にボタンを追加
const initialArticles = document.querySelectorAll('article');
initialArticles.forEach(article => {
    createPocketButton(article);
    article.classList.add('has-pocket-button');
});下記カスタムCSSを併用すると二行にならずに済むかもしれません。数値は任意で変更してください。
.xviCy:not(:last-child) {
    margin-right: 14px !important;
}Misskey v13.11現在、ハードミュートはリプライ元やリノートを貫通します。
プラグイン等で弄れる部分ではないため、ブラウザ側で強制非表示にするUserScriptを作成しました。
ブラウザにTampermonkeyなどの拡張機能を入れることで利用できます。
下記の// @match https://nijimiss.moe/*の部分を使用するサーバーに書き換えてください。ngWords = ["ミュート", "NGワード"];部にNGワードを指定/追加してください。
(AND指定などはできません)
仮想DOM生成の度にループ処理を回すので、NGワードの数が多いと重くなります。ご注意ください。
// ==UserScript==
// @name     Misskey Mute
// @version      0.1
// @description  Mute words on misskey
// @author  @[email protected]
// @grant    none
// @match        https://nijimiss.moe/*
// @run-at   document-idle
// ==/UserScript==

(function () {
    'use strict';
    // NGワードを設定
    const ngWords = ["ミュート", "NGワード"];
    const observerConfig = {
        childList: true,
        subtree: true
    };

    function observerCallback(mutationsList, observer) {
        for (let mutation of mutationsList) {
            if (mutation.type === 'childList') {
                const divs = document.querySelectorAll('div[tabindex="-1"]');
                divs.forEach(div => {
                    const divText = div.innerText.toLowerCase();
                    for (let word of ngWords) {
                        if (divText.includes(word.toLowerCase())) {
                            div.style.display = 'none';
                        }
                    }
                });
            }
        }
    }

    const observer = new MutationObserver(observerCallback);
    observer.observe(document.body, observerConfig);
})();
上記のソースをテキストエディタにて適当な名前.js(misskeyng.jsなど)で保存し、iCloudドライブなどに適当なフォルダ(Userscriptsなど)を作って入れておきます。
下記のアプリをインストールします。
Userscripts
UserScriptをiOSのSafariでも実行できるようになるアプリです。
</>のアイコンがあるかもしれません。Macも同アプリにて利用できるようです。今Macbookが使えないので下記などを参照ください。
UserScripts 公式GitHub
Chromeは拡張機能が使用できないので利用できません。
FireFoxは
Tampermonkey – Android Firefoxアドオン
から導入できます。
Firefoxの右上の︙からTampermonkeyを選び、新規スクリプト作成を行って上記コードを記述してください。
Tampermonkeyやgreasemonkeyなどの拡張機能を導入することで使用できます。
Tampermonkey – Chromeアドオン
Tampermonkey – Firefoxアドオン
Tampermonkey – Edgeアドオン
拡張メニューの「新規スクリプトを追加」から上記コードを貼り付けてください。
MisskeyはカスタムCSSで見た目を変更したり、AiScriptという独自言語でウィジェットやプラグインやゲームを作成できます。
自作したもの置き場です。23/7/23最終更新 Misskey v13.14.1対応